Residence Massacre Lakeview Camp — Night 3 Map
Lodge, Cabins 1–4, ammo crates, Trail Camera routes, and the Worker mutation cutscene explained.
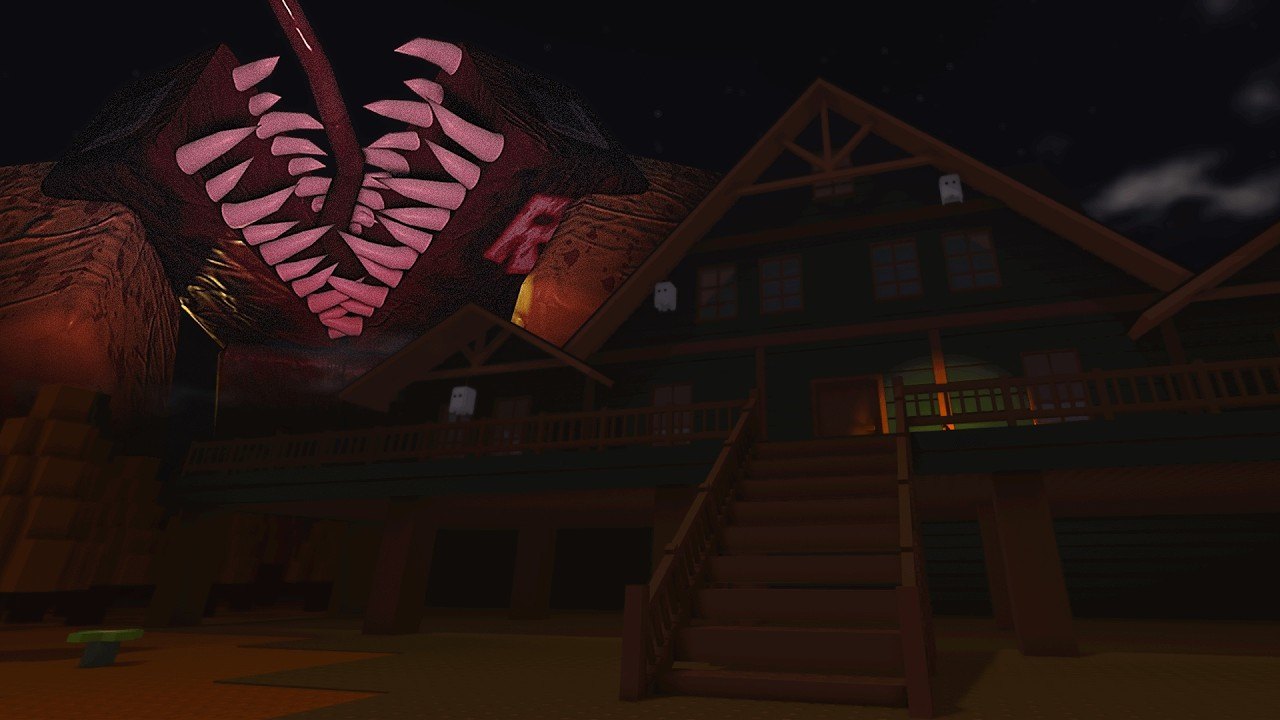
Lakeview Camp is the Night 3 map in Residence Massacre — a remote, forested campsite that you reach after falling asleep in the car with The Worker following the Lakeview Camp sign off a forest road. The map is built around a central Lodge with four surrounding Cabins, connected by dirt paths and a frozen lake. It introduces the Shotgun as the only ranged tool in the game and the Trail Camera + Camera Tablet combo as your only scout utility. This page covers the map layout, ammo economy, cabin rules, the Worker-to-Mutation cutscene, and the night-end Soldier encounter. Place 14437001043, online co-op, PvP removed January 9, 2026.
What Lakeview Camp actually is
The camp was a working holiday site that has been abandoned in a hurry. Doors hang open, personal effects scatter across the porch, and the signpost at the entrance points to the Lodge and to the Cabins area. The map is darker and more open than the previous nights — multiple routes for anomalies to approach, and you cannot rely on a single chokepoint. The forest surrounds the camp on all sides, and the frozen lake sits to the north. There is a Ranger Station in the camp but it is not a Shotgun spawn — the Shotgun is on a Lodge table.
Map layout
The map has five named structures and several crossroad areas. Memorize their positions; Shotgun ammo spawns rotate between crossroads each round.
| Structure | Location | Purpose |
|---|---|---|
| Lodge | East side of camp, past the entrance | Shotgun pickup, central room, cutscene room |
| Cabin 1 | Northwest cabins | Sleeping cabin (2 beds, 4 windows) |
| Cabin 2 | West cabins | Sleeping cabin (2 beds, 4 windows) |
| Cabin 3 | Southwest cabins | Sleeping cabin with nearby campfire (Marshmallow cooking) |
| Cabin 4 | Southeast cabins | Extra cabin — out of order in solo/duo or Bloodmoon, only active in trio+ non-Bloodmoon |
| Ranger Station | South edge of camp | Flavor prop, not a Shotgun spawn |
The signpost at the entrance forks left to Cabins and right to Lodge. The Worker always chooses the Lodge first and waits for you at the porch.
Getting to Lakeview Camp
The Player spawns next to a car that is out of fuel with The Worker standing near a road fence. The Worker says “Hey, you’re finally awake… Seems like there’s no one around to pick us up… I saw a sign ahead, we should check it out.” Both walk to a large welcome sign that reads Lakeview Camp. The Worker adds: “Lakeview Camp… Maybe we’ll find something to fix our ride.” Inside the camp, The Worker says: “I wonder if there’s anyone left” and then “Mmh… There’s a lodge ahead. Let’s check it out.”
The Lodge’s main door is locked. The Key is on the left side of the Lodge’s porch — pick it up, unlock the main door, and both characters enter. Inside the Lodge’s central room, The Worker says: “We should check out the cabins once you’re ready.” You then return to the signpost and head into the cabin area to loot.
The Gas Can hunt
Around the cabin area you can find 2–4 Gas Cans, with the exact count depending on the round. You must find every Gas Can before the night proper starts. The Worker wanders the cabin area with you — sometimes he coughs and splits blood under him, hinting that something is wrong with him. Once you collect the last Gas Can, The Worker heads back to the Lodge on his own. Weird sounds begin to come from the Lodge.
You follow him back. A previously locked room in the Lodge has its door open. The Worker is inside, pale with veins visible on his arms, leaning on a chair that has blood stains on it. He notices you and says:
“Oh… It’s just you.” “I’m…” “Not feeling too well…”
His chest splits in half revealing sharp teeth — the Worker has mutated into the Mutated Worker anomaly. You close the door, grab the Shotgun from the central room, and run to the cabins area. The Worker breaks down the door and follows. That is the moment 12 AM hits and the night timer begins.
Ammo economy
Shotgun shells appear at four fixed locations near the cabin crossroads:
- Camp 1 crossroad — one of the two ammo boxes guaranteed this round.
- Camp 2 crossroad — the other ammo box guaranteed this round.
- Lakeview + Camp 4 crossroad — only spawns shells half the time.
- Behind Camp 3 crossroad — only spawns shells half the time.
You refill by clicking the box, which refills both of your Shotgun shells. Refill in pairs — going out alone with one shell is the most common way to wipe solo runs. Pair refills with a teammate luring The Mutated Worker toward a different cabin while you loot the ammo crate.
Cabins 1–4
There are 4 Cabins on the map. Each cabin has:
- 4 windows with shutters that delay entry.
- 2 beds that hide you from The Mutated Worker (but not from The Spider).
- A light switch by the door that slows The Spider when it tries to enter.
- A fuse box on the side that powers the lights. Lights flicker and break after extended use.
- A hole behind the cabin that The Spider can crawl through.
The cabin rules:
- Cabins 1, 2, and 3 are always functional.
- Cabin 4 is out of order in solo and duo games, or whenever Bloodmoon is active, regardless of player count. If you need a fourth cabin, force a trio lobby and turn off Bloodmoon.
- With 2 beds per cabin and a maximum 2 players per cabin, three-player lobbies need to decide who goes where before night starts. If you have 4 players, use Cabin 4 only if your squad can hold Cabin 4 with a teammate.
Trail Cameras and the Camera Tablet
There are 4 Trail Cameras to place around the camp. Picking up any camera gives you a Camera Tablet, which lets you view the placed cameras from anywhere on the map. Unlike the residence nights, Night 3 cameras do not have a UV flash — the Tablet exists purely to scout where The Mutated Worker is before you leave a cabin for ammo.
Best camera placement is two cameras on the cabin approach roads and two cameras deep in the trees so you can see both the road and the forest. Spreading them out covers more ground.
Light, fuse, shutter loops
- Lights on = slower Spider entry. Use them when you hear the Spider at the window.
- Lights break after ~20 seconds of continuous use. The fuse box trips and you need to click each breaker three times to repair.
- Shutters add one extra layer. The Spider has to break the shutter before it can get to the window, and you get an audio cue while it breaks.
- A single Shotgun shell does not break a window if a shutter is closed — wait for the shutter to break first, then fire.
Marshmallows
Marshmallows are a Night 3-only consumable you can find while looting. Touching the campfire near Cabin 3 while holding a marshmallow cooks it:
- Perfectly cooked = best heal and stamina buff (the Perfect Cook badge).
- Overcooked / burnt = partial buff + visual gag (the Hell’s Kitchen badge, which rewards the Cheese Hat).
Ending sequence
When the night ends at 6 AM, the sun rises over the forest. The Player is carrying a Gas Can to refill the car. A sound of another engine comes from behind — a green tank with two Soldiers rolls into view. One soldier holds a gun, the other operates the tank. They confront you with the line:
“You were at that factory, weren’t you?”
The tank operator pulls out a photograph of several factory workers — The Worker is in the middle, identified as the Lead Factory Worker position. The soldier says:
“I assume you’ve seen the man in the middle before. If you know anything, I recommend you speak…”
The scene cuts to the Lead Factory Worker’s mansion and pans to the basement’s massive three-claw scar on the wall:
“It seems as if… something got to him before us.” “However, we didn’t find any body at his residence.”
Back to the Soldier:
“I’m afraid you’re gonna have to follow us.” “And no funny business.”
The screen fades to black and a popup appears: “Survived Night 3”.
Soundtrack references
The Night 3 ambience is built from royalty-free music tracks and SFX:
- Preparation Ambience: Forest Maze (Re-Orchestrated).
- Evening Lodge: Horror Tension.
- Lodge Escape: Horror Chase Chapter 1.
- Before the Night: Dark Ambient Clock.
- Night Ambience: Scary Horror Music.
- Mutated Worker’s Chase Theme: Horror Chase Chapter 2.
These tracks are credited in the closing credits of the night.
Co-op tips and voice lines
- “Talk to the worker” — first objective. Triggers automatically when you approach.
- “Find the lodge key” — second objective. Key is on the left side of the Lodge porch.
- “Find gas cans” — progress tracked as “X/Y collected.”
- “Return back to the lodge” — after the last Gas Can, head back fast.
- “Grab the shotgun” — mandatory before leaving the Lodge.
- “Run” — fleeing the Lodge after the mutation cutscene.
- “Survive the night” — last objective until 6 AM.
Strategy recap
- Stay in your assigned cabin. Communicate with voice — pub lobbies without a caller wipe on Cabin 4 spawns.
- 4 Trail Cameras placed far apart = best scouting. Tablet is for safety, not panic.
- 2 Shotgun shells is your whole budget. First shell = Spider. Second shell = emergency. Refill in pairs with a teammate lure.
- Cabin lights on when the Spider is at the window; off when The Mutated Worker is on his way in.
- Marshmallow near Cabin 3 campfire is your only heal — perfect cook for the buff.
- Avoid marking yourself with The Spider’s mark. Marked = door destroyed + Husk inbound.
- The Worker NPC can be killed by the Husk or Spider in the cutscene — you cannot save him. He is canonically mutated.
Lakeview Camp connections
- Night 3 walkthrough — full step-by-step with role assignments.
- Shotgun — the only ranged tool on Night 3.
- The Worker — your ally who mutates here.
- The Spider — the head anomaly that marks cabins.
- Camera Tablet — the only way to view Trail Cameras.
- Trail Camera — the 4 placeable cameras you place here.
- Soldiers — the NPCs you meet at the night-end cutscene.
- Night 3 Modifiers — Graves, Bloodmoon, Blizzard stacks.
Frequently Asked Questions
Quick answers for Residence Massacre survivors.
Where is Lakeview Camp in Residence Massacre?
Lakeview Camp is the Night 3 mainline map. You reach it after the player character falls asleep in the car and wakes up next to The Worker on a forest road; both of you follow the Lakeview Camp sign into the abandoned holiday site.
How many cabins are on Lakeview Camp?
Four cabins. Cabins 1, 2, and 3 are always functional. Cabin 4 is out of order in solo or duo games, and is also out of order whenever the Bloodmoon modifier is active regardless of player count.
Where do you find the Shotgun on Lakeview Camp?
On one of the tables in the central room of the Lodge. You cannot leave the Lodge without picking it up — an invisible wall stops you and the objective reads "Grab the Shotgun." Picking it up gives every player in the lobby a copy.
How many Shotgun shells can you carry on Night 3?
Two shells. There is no magazine — you get 2 shells at pickup and refill at ammo boxes near Cabins 1, 2, 3, and 4. Ammo boxes refill both shells with one click.
How many Trail Cameras are there on Night 3?
Four Trail Cameras. Picking up any camera gives you a Camera Tablet so you can view the placed cameras from anywhere on the map.
What happens to The Worker at the end of the night?
After you collect all the Gas Cans, The Worker returns to the Lodge on his own and mutates in a locked room — his chest splits in half revealing sharp teeth. He chases you from the Lodge to the cabins area, where his head separates into The Spider. Both The Husk and The Spider disappear at 6 AM.
Do you meet the Soldiers at the end of Night 3?
Yes. After 6 AM a green military tank with two Soldiers rolls up. They ask "You were at that factory, weren't you?" and force the player to follow them for further questioning, ending with a "Survived Night 3" popup.